Webhook, next to the API, is a mechanism that allows communication between the servers. This article is intended mainly for developers and advanced users.
Using webhooks reduces server load, because the necessary information is automatically sent from the store at the time when a specific event occurs (after certain changes in the store), there is no need to frequently check if some changes where made by API.
Webhook is a new mechanism in the platform that sends informations under the given URL directly after the predefined actions such as: after payment or new client registration . The solution provides a simple and effective method of communication between the store and the external server, without the need for recurring querying application.
It provides:
- event notifications are received exactly at the time of the existence of, without the need for too frequent querying application - the ability to more efficiently synchronize data between servers,
- is the ability to create chains of events such as – the store sends information to the server, which will further communicate with for example. ERP application
- store application may be enhanced with new features without changing the code in the store.
Webhooks give you also full security, they have: support for encryption of transmitted data through SSL certificate verification of the authenticity of the current request right into using the checksum verification of the store after the IP address.
- Go to CONFIGURATION > ADMINISTRATION, SYSTEM > WEBHOOKS , and then click add webhook

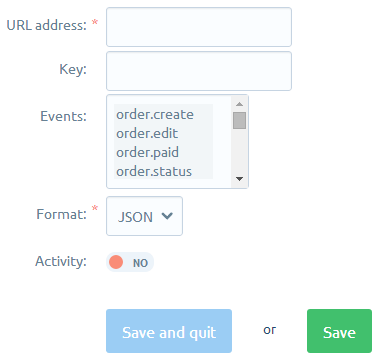
- Fill out the form to create a webhook

URL address - a link to a file that will handle the request,
Key - an optional field that can be used to verify the authenticity of a webhook,
Events - select the event after which the webhook is sent,
Format - the format of the data passed by the webhook,
Active - select yes to make this webhook active. - Click the Save button. Webhook is ready and from now on in the History, you can check all sent request.
- Under specified URL, you need to prepare a script that will handle the request.
The webhook receiving sample script, might look like this:
|
1
2
3
4
5
6
7
8
9
10
11
12
|
<!--.=" Suma kontrolna: ". sha1($_SERVER['HTTP_X_WEBHOOK_ID'] . ':' . $secret_key . ':' . $data) . PHP_EOL; if(empty($data) ||!isset($_SERVER['HTTP_X_WEBHOOK_ID']) || !isset($_SERVER['HTTP_X_WEBHOOK_SHA1']) || sha1($_SERVER['HTTP_X_WEBHOOK_ID'] .':' . $secret_key . ':' . $data) !==$ _SERVER['HTTP_X_WEBHOOK_SHA1'] ) { $log.=" Invalid Hash".PHP_EOL; } $log .=' SHOP VERSION:' . $_SERVER['HTTP_X_SHOP_VERSION'] . PHP_EOL; $log .=' SHOP HOSTNAME: ' . $_SERVER['HTTP_X_SHOP_DOMAIN'] . PHP_EOL; $log.=' SHOP LICENSE: ' . $_SERVER['HTTP_X_SHOP_LICENSE'] . PHP_EOL; $log .=' WEBHOOK ID: ' . $_SERVER['HTTP_X_WEBHOOK_ID'] .PHP_EOL; $log .=' WEBHOOK NAME: ' . $_SERVER['HTTP_X_WEBHOOK_NAME'] . PHP_EOL; $log .=' WEBHOOK SHA1: ' . $_SERVER['HTTP_X_WEBHOOK_SHA1']. PHP_EOL; $log .=' USERAGENT: ' . $_SERVER['HTTP_USER_AGENT'] . PHP_EOL; preg_match('/^(.*)\; charset\=(.*)$/', $_SERVER['CONTENT_TYPE'],$matches); $log .=' CONTENT TYPE: ' . $matches[1] . PHP_EOL; $log .=' ENCODING: ' . $matches[2] . PHP_EOL; $log .=' DATA:'. $data. PHP_EOL; if($matches[1]===' application/json') { $data=j son_decode($data); // … } elseif($matches[1]==='text/xml') { $data=s implexml_load_string($data); // … } else { $log.=" Content type not supported".PHP_EOL; } file_put_contents("log.txt",$log, FILE_APPEND); ?--> |

