To proceed with Bulk uploading procedure, we need below listed details:
- Product Information like product name, price, GST component category and description etc.
- Product images (Recommended size is 1200px and should not weigh more than 2MB)
- Your computer system should have either Microsoft Excel, LibreOffice or Spreadsheet to manage the data in CSV* format.
CSV stands for ‘comma separated values’, a file format (.csv) for spreadsheets. - Access to File Manager for uploading your product images* would be given once the store license is bought from Zencommerce.
*Images: please avoid spaces while naming product images, you may use ‘_’ or ‘-’ to replace with the space if required.
For example: Image name is ‘my product image.jpg’ so you can rename to ‘myproductimage’ or ‘my-product-image’
General Rules to follow when you are managing products with the CSV file:
- The order of the fields and the field names must match both on the profile side and in the file
- The imported file must be saved in the following encoding: unicode - UTF-8. If you are working in Excel then by default the encoding is set to UTF-8 and if working in LibreOffice then you need to set it manually.
- Import and export do not include variants, attributes and product promotion
- During import, a product can only be assigned to only one category tree.
- Import using the option Data scope profile - ‘Update and adding’, will create new category trees and new manufacturers (if they do not exist in the database)
- Photo links must be in separate columns [images 1, images 2, images 3…] and should be positioned in the last columns in the CSV file. Image link updated in images 1 column would be considered as the main image in the product card.
Key highlights to proceed:
- Export the file format from the Zencommerce admin panel.
- Arrange all the product data as per the exported CSV file from Zencommerce.
- Upload the product images in the File manager, access given in the Zencommerce admin panel. If you have access to other servers then you may upload the images and use it’s link. Kindly note, Dropbox and Google drive links are not accepted.
- Update the Image path in the CSV file and you are ready to upload the products on the store in a few clicks.
The above highlighted pointers are explained below in steps. Kindly follow the same and upload your products using a CSV file.
1. Steps to Export the file format from Zencommerce admin panel
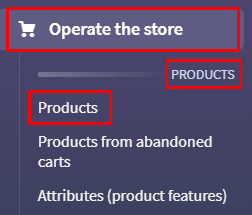
A. Login to your Zencommerce admin panel and navigate to ‘Operate the Store > Products’
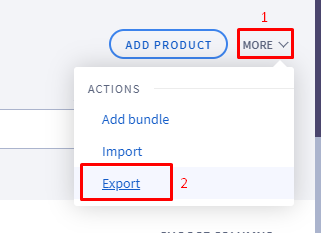
B. From top-right side of the panel, click on More > Export
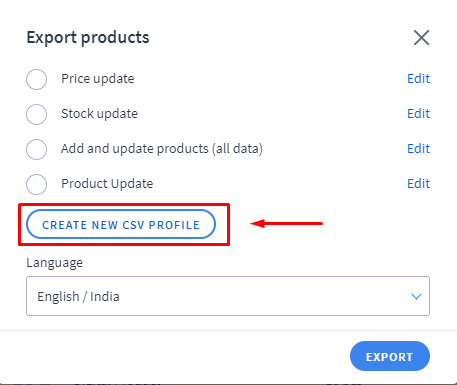
C. Create a CSV profile with the required fields, So kindly click on 'Create New CSV profile'.
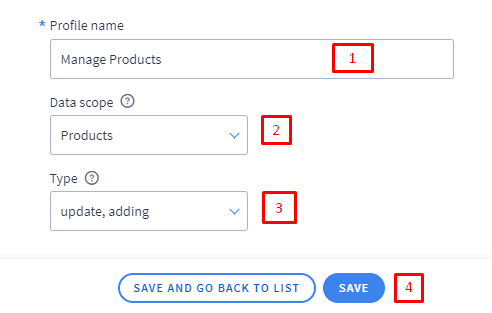
D. Set the 'profile name', it can be titled with any name and set the options Data Scope :- Products and Type :- Update and adding and save it.
Note: The ‘type’ option has two options explained below:
- Update:
This option is to be used when we want to update the details of the product which is already uploaded. The product information as in Product Price, Product name or Product description etc. - Update and adding:
This type to be used when we are adding new products in the store. This option also allows us to update information of existing products. This profile takes care of adding new SKU/Product in the store and also can be used to update the existing product details.
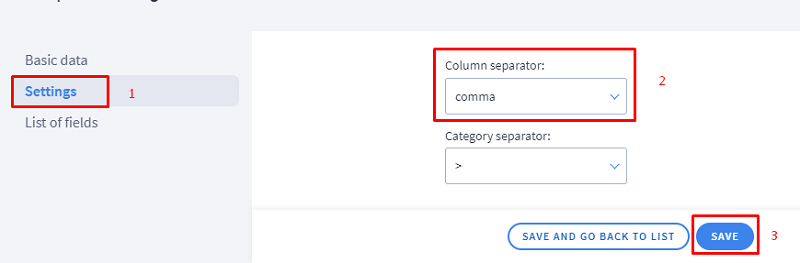
E. In the left vertical menu, click on ‘Settings’ and select option ‘Column separator as comma’ and ‘save’ it.
F. Click on ‘List of Fields’ from the left menu and you would notice that some fields are auto-checked and highlighted in red colour which indicate that these fields are mandatory and cannot be skipped while updating the data in the CSV format.
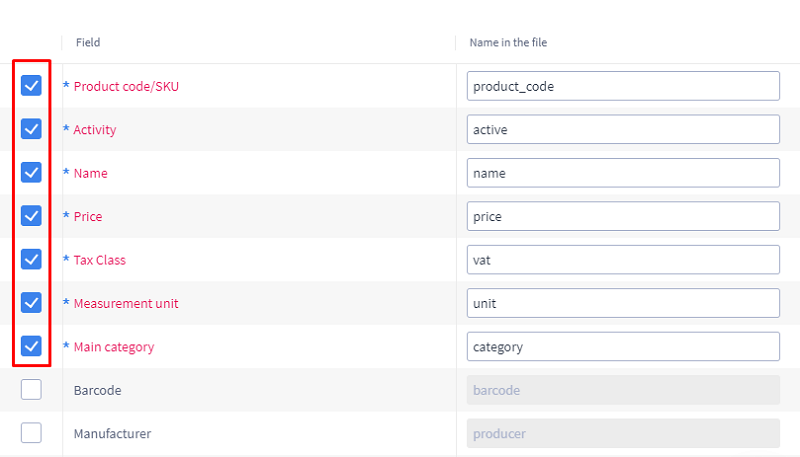
Note: If the set profile is of Type Update then only the SKU field would be auto-selected as it being the mandatory field and all details are indexed with respect to products SKU.
G. Select the other required fields you would like to update and click on the ‘Save’ button present at the extreme bottom of the page. The recommended Fields are Manufacturer/producer, Retail Price/other_price, Weight, Description, Homepage/mainpage, Stock, Stock Alert/Stock_warnlevel, Images etc.

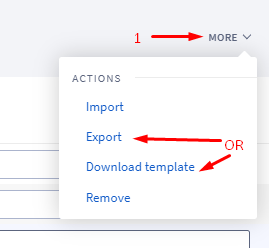
H. Once the profile is saved, Click on More link and click either on the button ‘EXPORT’ OR ‘Download template’.
- The ‘Export’ option would download all the product information which is already present on the website which also gives you an idea of filling product details.
- The ‘download template’ option would simply download the selected fields/headers in the CSV.
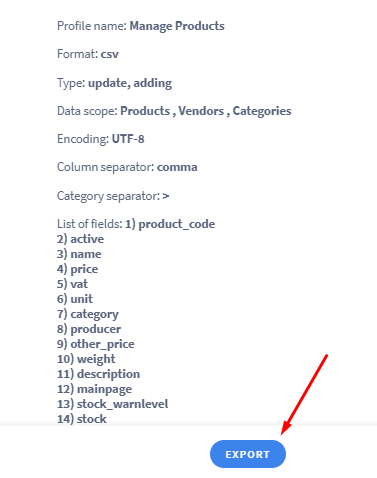
I. On the next page, you would be shown the settings you have made in the profile along with the fields. Kindly review the same and click on the Export button.
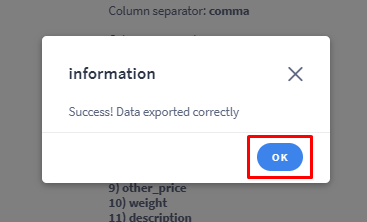
J. Wait for the export operation to complete its task and give a success message. Click on the OK button to download the CSV format.
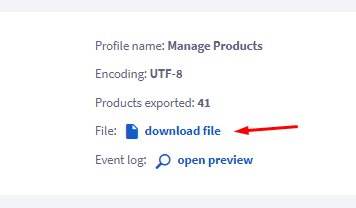
K. Click on the download file link and open the downloaded file from the system's download folder.
2. Arrange all the product data as per the exported CSV file from Zencommerce admin panel.
The first row of the exported CSV file are the headers which we had selected for updating our product information. We should follow the same order for inputting the product information in the corresponding columns.
To understand these fields and input data, kindly go through below information:
A. Product code/SKU (product_code) - Stands for ‘stock keeping unit’ and should have a unique code for all the products.
B. Activity (active) - This option allows you to display/hide products on the website.
You may update this field with either numeric 1 or 0, setting the value to numeric ‘1’ would keep the product active on the website and ‘0’ would disable the product on the website.
C. Name (name) - The title of your product. For example ‘Pearl Necklace Set’
D. Price (price)- The price of the product inclusive of GST, do not include any currency symbol.
E. Tax Class-GST (vat) - Add value of the tax included in the product price along with the percentage sign. For example: 5%, 18% etc.
F. Measurement Unit (unit)- Allocate the unit to the products, for example PCS, Qty, Kg etc.
G. Main Category (category)- This represent category structure where you want to list respective product on website
For Example: If we have a women jewellery products and we would like to categorize in subcategories in terms of Necklace, Bangles, rings etc then the format for listing the category would be ‘Main category > Subcategory.
Example: we can write Jewellery > Necklace(2 level menu) or Women > Jewellery > Necklace (this format would create 3 level menu)
Note: ‘ > ’ with 1 space on either side acts as a separator between the categories.
H. Manufacturer (producer) - This option allows you to assign brands, Manufacturer, vendor to the products and you can display this information on the website.
I. Retail Price (other_price) - This option allows store owner to display MRP price of product irrespective of product selling price.
For Example: If product selling price is Rs. 100 and if you wish to show Rs. 300 as MRP then you can use this option.
J. Weight (weight)- Please define the weight of the product without unit.
Note: Only one unit would be followed for all the products and it has to be set in the admin panel under ‘Settings > Products > Units.
K. Priority (priority)- This field can be used to set the location/position of the product on the product-list page. Greater the number, higher the position given to the product.
L. Short description - In this section, we can describe the product in short.
Note: If the description is in a paragraph form, then the paragraph should be written using html tags such that ‘<p>’ tag at the start of the para and end it with ‘</p>’.
For example, the below description has to be formatted by adding HTML tags as it's a 2 paragraph.
Gold-toned contemporary drop earrings, gold-plated, has artificial stones and beads.
Secured with a post and back
Formatted Description:
<p>Gold-toned contemporary drop earrings, gold-plated, has artificial stones and beads</p><p>Secured with a post and back</p>
M. Description - In this section, we can describe the detailed information of the product. Use HTML tags if you have paragraphs.
N. Home page(mainpage) - This option is used to display products on the homepage. We can input numeric 1 or 0, setting numeric 1 will display the product on the Homepage under section ‘Recommended products’ section.
O. Home page - priority(mainpage_priority) - This field can be used to set the location/position of the product on the homepage. Higher the value is set, the first the product would be displayed on the category page.
P. Price (wholesale) and Price (special) - This option allows you to set different price for the customers group.
To activate this option, Go to Settings > Products > Product Settings : Pricing Levels.
Q. PRODUCT_S_PRICE_BUYING(price_buying) - This option is applicable only for store admin reference where one can add the product buying price(Visible only to admin in the admin panel).
R. Stock (stock) - Allows you to set the available quantity in inventory.
S. Stock_warnlevel (stock_warnlevel) - The Qty set for warn-level would send an reminder to the admin on the dashboard of the panel on reaching the stock value.
T. Seo_title, seo_description, seo_keywords - This parameters allow you to set information on the product details page as per the search engine standards and the characters should be restricted to 70 char to Page title, 320 char to meta description and 15 phrases of keywords separated by comma.
U. Images (images)- The images has to be uploaded in the File manager and the path should be given in the CSV or one can use image links updated on other servers/photobucket except for dropbox and Google drive.
3. Upload the product images in the File manager. If you have access to other servers then you may upload the images and use it’s link. Kindly note, Dropbox and Google drive links are not accepted.
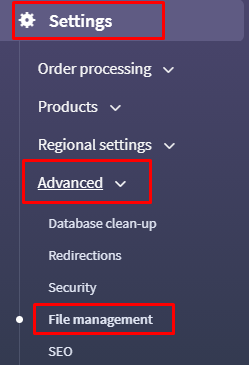
A. To upload the images in file manager, kindly navigate to Settings > Advanced > File Management
B. Click on Manage Files
C. We can either upload all the images here or we can also create a directory/folder by clicking on the ‘Create’ button and upload all images.
- The link to the images uploaded without any directory should be generated in the below format:
https://www.yourdomain-name/upload/Image-name.extension
- If a directory created with title ‘Jewellery’(case sensitive) and uploaded images, then the link should be generated in below format.
https://www.yourdomain-name/upload/Jewellery/Image-name.extension
For example: If the Domain name connected to the store is www.abc.in and image uploaded in a folder Jewellery is a .jpg extension then the link would be:
https://www.abc.in/upload/Jewellery/Image-name.jpg
Once the image uploading is done, kindly add the links in the CSV file and save the file in .csv format and you are ready to upload it to the store.
4. To import the .CSV file in the admin panel,
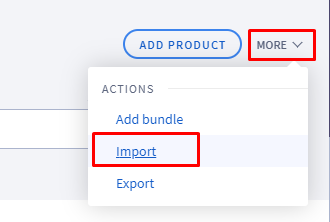
A. Kindly navigate to Operate the store > Products
B. Click on More link from top-right corner and click option ‘Import’
C. Select the same profile which was used to export the format. Next load the updated CSV and click on Import.
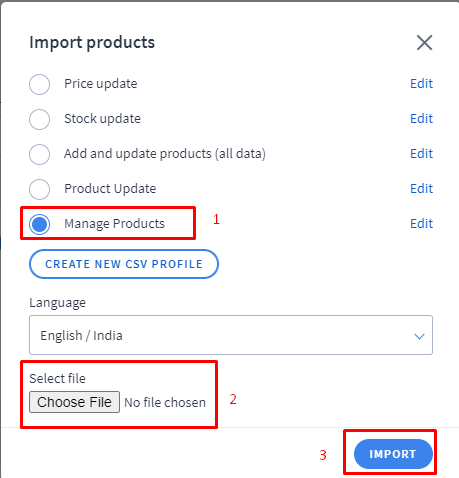
D. Wait for the Import operation to complete its task and give you a success message. Click on the Ok button.
E. You would be notified if the import operation successfully completed its tasks(the number of imported products should correspond to the number of detected products). Skipped products count should be 0.
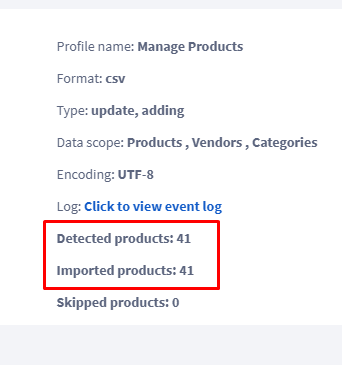
If the imported and detected products number does not match then it indicates that few products are skipped and the reason for skipping these products can be checked by visiting the event log link.
